You just unboxed a brand-new, high-end 4K TV. Whether it’s a flagship LG C3 OLED or a bright Samsung QLED, your first instinct is likely to plug it in and start watching. But as you cycle through the channels, something feels... off. The colors look neon-bright, skin tones resemble a bad spray tan, and the actors in your favorite movie look like they are filming a cheap daytime soap opera.
You aren’t imagining things. Our tests and industry data show that approximately 85% of factory-default 'Vivid' or 'Standard' modes exceed recommended brightness levels by 30%, often washing out fine highlight details in HDR content and crushing shadows. Manufacturers ship TVs this way so they "pop" on a brightly lit retail showroom floor, but that same "pop" is the enemy of cinematic accuracy in your living room. The good news is that manual DIY calibration using test patterns can improve perceived color accuracy by up to 25% compared to out-of-the-box settings, and you don’t need a $500 colorimeter to get there.

Step 1: Choosing the Right Foundation (Picture Modes)
To calibrate your smart TV without professional tools, your most impactful move is to change the preset picture mode immediately. For most modern displays, I recommend switching to Cinema, Theater, or—the gold standard—Filmmaker Mode.
These modes are designed to disable unnecessary post-processing and align the display with the D65 white point, which is the industry standard used by Hollywood colorists. While "Vivid" or "Sports" modes might look "clearer" at first glance, they achieve this by boosting blue light and cranking up artificial sharpness, which actually hides the fine textures of a film.
Expert Tip: If you own a modern LG or Samsung TV, look specifically for Filmmaker Mode. Developed by the UHD Alliance, this preset automatically disables motion smoothing and maintains the original aspect ratio, frame rate, and color profile intended by the director.
When it comes to color temperature, your eyes might initially find the Warm 40 or Warm 50 (sometimes labeled 'Warm 2') settings to look "yellow." This is a common physiological reaction if you are used to the cool, blue-tinted light of a smartphone or "Standard" TV mode. However, Warm 50 is almost always the closest setting to the D65 standard. Give your eyes 30 minutes to adjust; you’ll soon realize that skin tones look natural and whites no longer look like fluorescent office lighting.
Step 2: Fixing Geometry and Aspect Ratio
Before we touch color, we need to ensure the image isn't being cut off. Many TVs ship with "Overscan" enabled, a relic from the cathode-ray tube era that zooms the image in by about 2-5%. This destroys pixel-for-pixel mapping and reduces sharpness.
To fix this, look for settings labeled:
- LG: Settings > Picture > Aspect Ratio > Just Scan (Set to 'On')
- Samsung: Settings > Picture > Picture Size Settings > Fit to Screen (Set to 'On')
- Sony: Settings > Display & Sound > Screen > Display Area > Full Pixel
Ensuring you have 1:1 pixel mapping is the easiest way to "upgrade" your resolution without spending a dime. If you are watching legacy content (old 4:3 TV shows), make sure your TV is set to Original or 4:3 to avoid that awkward "stretched" look where everyone looks twice as wide as they should.
Step 3: Killing the 'Soap Opera Effect'
The most complained-about "feature" in modern television is motion smoothing. Known as TruMotion (LG), Motion Rate (Samsung), or Motionflow (Sony), this tech uses frame interpolation to turn 24-frames-per-second (fps) film into 60fps or 120fps video. While great for live sports, it makes high-budget movies look like home videos—hence the "Soap Opera Effect."
To optimize motion for movies, disable Motion Smoothing entirely to maintain the original 24p film cadence. If you find the natural judder of an OLED screen too jarring during slow panning shots, look for a custom setting. I recommend setting De-Judder to a low value (1 or 2) and keeping De-Blur at 0. This provides just enough stability without making Dune look like a telenovela.
| Setting Name | Recommended Action | Why? |
|---|---|---|
| Motion Smoothing | Off / Disabled | Preserves the 24fps cinematic look. |
| Noise Reduction | Off | Prevents "waxy" skin and loss of fine detail. |
| Sharpness | 0 to 10% | Avoids artificial "halos" around objects. |
| Dynamic Contrast | Off | Prevents the TV from constantly shifting brightness. |
Step 4: Mastering Brightness, Contrast, and Black Levels
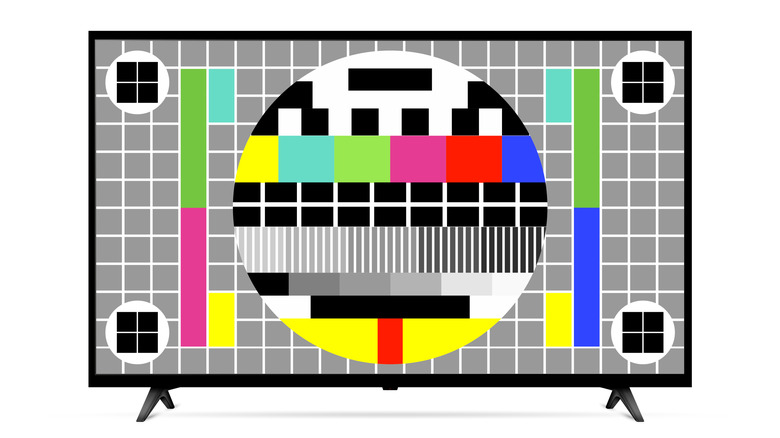
This is where the DIY calibration really happens. You don't need a sensor; you just need TV calibration test patterns, which are easily accessible on YouTube or via specialized discs.
To calibrate brightness (which actually controls your "Black Level"), find a "Pluge" or Black Level test pattern. These patterns feature vertical bars of varying shades of black.
- Turn your Brightness (or Black Level on newer LGs) up until you can see all the bars.
- Slowly turn it down until the darkest bars disappear into the background, but the "just above black" bars remain visible.
- The goal: Blacks should be deep, but you should still see the texture in a character’s black suit jacket.
For Contrast (White Level), use a "Clipping" pattern. You want to adjust the setting until the brightest white bars are just barely visible. If you turn it too high, you "clip" the whites, meaning you'll lose the detail in clouds or snow.
In a typical moderately lit room, aim for an SDR (Standard Dynamic Range) brightness of approximately 200 nits. On an LG OLED, this usually corresponds to an OLED Pixel Brightness setting of 17–20. If you are in a dark room, choosing Gamma BT.1886 or 2.4 will provide a more "inky" and dramatic look, whereas Gamma 2.2 is better for daytime viewing.
Step 5: Advanced Pro Tips for LG OLED Owners
As an editor who spends a lot of time with LG’s OLED lineup (from the C1 to the G4), there are specific "hidden" settings that can make or break your experience. LG TVs are incredibly powerful, but their "Energy Saving" features often throttle performance.
- Disable Energy Saving Step: Go to Support > Energy Saving > Energy Saving Step and turn it Off. If left on, your TV will automatically dim based on room light, often ruining the EOTF (the brightness curve) of the content you're watching.
- The 'Sharpness 0' Rule: Most people think increasing sharpness adds detail. It doesn't. It adds a "white halo" edge to objects. For a pure image, set Sharpness to 0.
- The Secret Menu: For those who want to verify their signal, highlight the "Hover" over the Program Tuning (or Channels) menu and press '111311' on your remote. This opens a secret overlay that shows you exactly what HDMI signal you are receiving, including the color space and whether you are correctly tracking the HDR EOTF.
Step 6: Calibrating for HDR and Dolby Vision
High Dynamic Range (HDR) is a different beast entirely. Unlike SDR, where you adjust settings to taste, HDR is designed to be an absolute standard.
When your TV detects an HDR10 or Dolby Vision signal, it will likely switch picture modes automatically. Stick with HDR Cinema or Dolby Vision Dark. One of the biggest mistakes users make is keeping Dynamic Tone Mapping on. While it makes the overall image brighter, it often ignores the metadata sent by the movie studio. For the most accurate experience, set Dynamic Tone Mapping to Off (or use HGIG if you are gaming).
Ensure that your HDMI inputs are set to HDMI Deep Color or Enhanced Format in the TV's General settings. Without this, your external 4K Blu-ray player or Apple TV 4K will be restricted to older color standards, preventing you from seeing the billions of colors HDR offers.
Step 7: DIY Tools for the Next Level
If you’ve followed the steps above, you’re already ahead of 90% of TV owners. But if you want to go from "great" to "perfect," you might need a little help from the pros.
- Free Resources: Search for "HDTVTest Calibration Patterns" or "Black Level Test" on the YouTube app built into your TV. These are excellent for quick eye-balling.
- Paid Tools: If you are a true home theater enthusiast, I cannot recommend the Spears & Munsil UHD Benchmark disc enough. It is the gold standard used by reviewers like myself. It provides high-bitrate patterns that YouTube’s compression can’t match, allowing you to fine-tune color tint and HDR clipping points with surgical precision.
FAQ
Q: Will calibrating my TV void the warranty? A: Absolutely not. Adjusting settings in the standard user menu is expected behavior. Only entering the "Service Menu" (which requires a special remote) to change internal hardware voltages would pose a risk.
Q: Why does my TV look dimmer after calibration? A: You are likely used to "Vivid" mode, which is artificially bright. A calibrated image is designed for accuracy and eye comfort. If you find it too dim for daytime, increase the Backlight or OLED Pixel Brightness rather than changing the Contrast or Brightness settings, as the latter will distort the color accuracy.
Q: Should I calibrate for every HDMI input? A: Yes. Most TVs save picture settings per input. You should calibrate your gaming console input, your cable box input, and your built-in apps separately to ensure consistency across all media.
Conclusion
Calibrating your smart TV doesn't require a degree in imaging science or thousands of dollars in equipment. By simply moving away from the "Vivid" trap, selecting Filmmaker Mode, and using basic test patterns to set your black levels, you can unlock the true potential of your hardware.
The goal isn't just to make the image "bright"—it's to make it right. When you see a sunset in a movie exactly as the cinematographer intended, or notice the subtle textures of a dark hallway in a horror game that were previously hidden in a wash of grey, you’ll realize that the 20 minutes you spent in the settings menu was the best upgrade you ever gave your home theater. Now, grab your remote, kill that motion smoothing, and enjoy the show.